Jest, Testcontainers 如何不重新建立 container 情況下執行 e2e 測試?

前言
前不久才研究 Testcontainers 如何套用在 jest e2e 測試環節中,不過這方面進展不錯,目前在每次執行 e2e 測試時都能啟動新的 MySQL 容器並且套用 Primsa 的 migration,用起來真香啊。
但是仍存在一個令我困擾的問題,就是在每一次跑測試時都會 Recreate 一次 Testcontainers,我在想可不可以像過往一樣就把 DB Container 開著,在跑測試時直接用就好。
解決方案
Testcontainers Node.js 官方文件提到:
Enabling container re-use means that Testcontainers will not start a new container if a Testcontainers managed container with the same configuration is already running.
This is useful for example if you want to share a container across tests without global set up.
const container1 = await new GenericContainer("alpine")
 .withCommand(["sleep", "infinity"])
 .withReuse()
 .start();

const container2 = await new GenericContainer("alpine")
 .withCommand(["sleep", "infinity"])
 .withReuse()
 .start();

expect(container1.getId()).toBe(container2.getId());
Container re-use can be enabled or disabled globally by setting theTESTCONTAINERS_REUSE_ENABLEenvironment variable totrueorfalse. If this environment variable is not declared, the feature is enabled by default.
而在 Jest globalSetup 階段,以 MySQL 為例,我們可以透過 withReuse方法複用 Container。
import { Config } from '@jest/types'
import { MySqlContainer } from '@testcontainers/mysql'
import { Logger } from '@nestjs/common'


export default async function (
    globalConfig: Config.GlobalConfig,
    projectConfig: Config.ProjectConfig,
) {
  Logger.log('starting test db...')
  const mysqlContainer = await new MySqlContainer('mysql:8.4')
      .withUsername('user')
      .withUserPassword('password')
      .withDatabase('pc')
      .withExposedPorts({
          container: 3306,
          host: 3307,
      })
      .withReuse()
      .start()
  globalThis.mysqlContainer = mysqlContainer
  // ...
}
setup.ts
💡
在 Jest 環境下,要達成後續每次執行測試時都 Reuse,在 globalTeardown 階段就不要把 started 的 Container 關閉掉。
否則後續執行測試時,就會找不到已啟動的 Container 去做複用,到時候又得建立一個新的 Container,這樣就本末倒置了😂。
否則後續執行測試時,就會找不到已啟動的 Container 去做複用,到時候又得建立一個新的 Container,這樣就本末倒置了😂。
您可以設定好 Jest 環境變數,搭配下方條件判斷式來決定是否要關閉已啟動的 Container
import { Config } from '@jest/types'
import { Logger } from '@nestjs/common'

export default async function (
    globalConfig: Config.GlobalConfig,
    projectConfig: Config.ProjectConfig,
) {
    await closeApp()
    if (projectConfig.globals.CLOSE_TEST_DB) {
        await closeDb()
    }
}

async function closeApp() {
    Logger.log('closing app...')
    await globalThis.app.close()
    Logger.log('app closed...')
}

async function closeDb() {
    Logger.log('stopping db...')
    await globalThis.mysqlContainer.stop()
    Logger.log('db stopped...')
}
teardown.ts
{
  // ...
  "globalSetup": "<rootDir>/test/setup.ts",
  "globalTeardown": "<rootDir>/test/teardown.ts",
  "globals": {
    "CLOSE_TEST_DB": false
  }
}
jest-e2e.json
效能比較
測試環境
- OS: Windows 11
- CPU: 11th Gen Intel(R) Core(TM) i5-1135G7 @ 2.40GHz
- Disk: 美光 Crucial P2 1000GB NVMe
- RAM: 24GB (16+8) DDR4-3200
- Docker Image: mysql:8.4
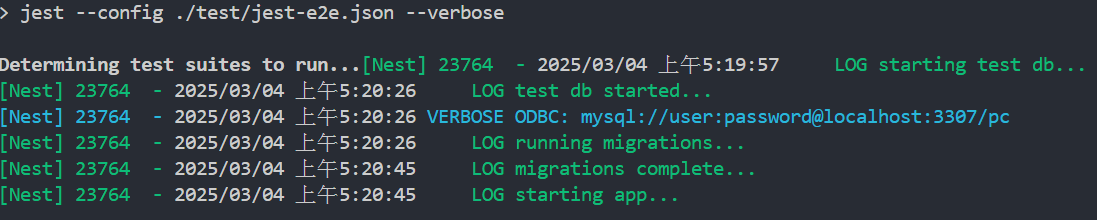
沒有 Reuse
有 Reuse

💡
在使用 reuse 的狀態下,後續每次執行 e2e 測試時,都能夠為我節省數十秒的時間。
Reuse Testcontainers 在使用上仍需注意幾點:
- 在 e2e 測試環境下為了確保測試獨立性,需要確保每次執行的測資、DB Schema 都是乾淨、設定好的。
- 後續若沒有使用到 Testcontainers 時,可以手動將該容器關閉掉,以釋放空間。


